ReCharge Integration
ReCharge Setup Guide, this page provides step-by-step guidance on obtaining credentials, which are essential for the setup process.
Last updated 6 months ago

What is Recharge
Recharge is a popular subscription billing and e-commerce platform that provides businesses with the tools and features to create and manage subscription-based products and services. It is designed to help businesses of all sizes grow their recurring revenue streams and improve customer retention rates. The platform offers many features, including customisable subscription plans, automatic billing and invoicing, product management, customer management, and analytics and reporting. It also integrates easily with popular e-commerce platforms like Shopify, Magento, and WooCommerce. With Recharge, businesses can create a seamless and personalised subscription experience for their customers, from customising product offerings to managing billing cycles and payment methods. Overall, Recharge is a comprehensive and user-friendly platform that provides businesses with the tools and features they need to succeed in the subscription-based economy.

Obtaining your API Keys from Recharge
Start by logging into your ReCharge Admin Portal using your login credentials.
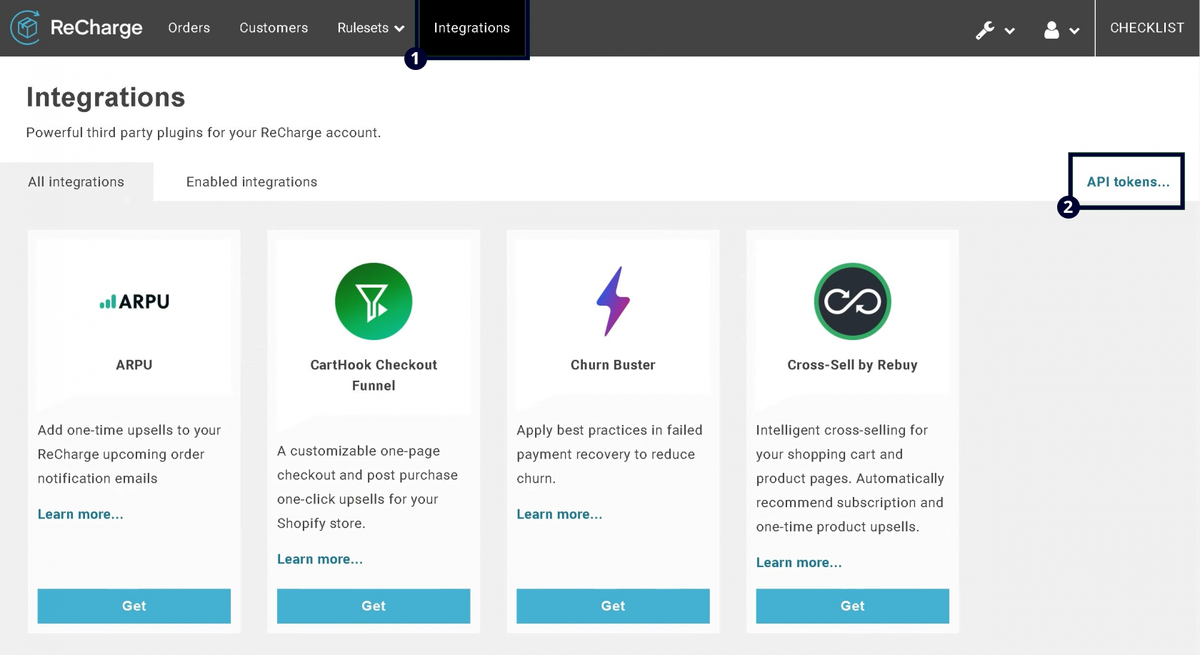
Once logged in, locate the "Integrations" tab on the top menu and click "API Tokens".
Click on the "Create an API Token" button from the API Tokens page.
A message will appear on the screen with three checkboxes. To proceed, select all three checkboxes and click on "Accept".
After accepting the message, you will be redirected to the "Create an API Token" page. In the "Details" section, enter a "Token nickname" and "Contact email" into their respective fields.
In the "Permission" section, you will see various scope permissions. To give the token "Read and write access" to "Orders" and "Products", select these two scopes from the drop-down list.
Finally, click on the "Save" button to create the token.
Upon successful creation, you will be redirected to the API Tokens page, where you can see your newly generated token. You can now use this access token to set up your ReCharge channel on Orders.

Installing the ReCharge Sales Channel
To add the ReCharge sales channel to your Neuro account, kindly adhere to the following steps:
Access your account and go to the left side of the screen. Click the "Stores" button.
If you already have a store, click "View Store" on the right side of the screen to access it.
To edit an existing store, click the edit button on the right side. If you need to create a new store, click "+ ADD" above, name it, and use the edit button to make changes.
Click "+ ADD" in the channels section to begin the installation.
A window will appear in the centre of the screen. Choose "ReCharge" from the available channels list.
Provide the required information:
Channel Name: In the field provided, you can enter any name. However, it is recommended that you choose a name that has meaning to you, such as "ReCharge," as it will serve as an apparent reference for the source of the order in the future.
Access Token: Please enter the information obtained through your ReCharge platform earlier.
After filling out the fields, customise other options, then click "Save" in the bottom-right corner.
You'll be back in the recently installed channel. Activate it at the top of the screen using the "Is Active" button.
Congratulations! You've successfully set up your ReCharge sales channel on Neuro.
You can now sell products on ReCharge and manage orders from your Neuro dashboard.
Click to Maximise the Video.
For additional support, contact the Neuro Support Team.